One of the things I love best about the holiday season is unexpected guests at meal time. No, really. I genuinely mean that with zero sarcasm at all. Why do I love something that so many dread? I love the excitement, the conviviality, the boisterous fun, and the challenge of stretching a meal that was intended for seven into a meal for however many we may have had the great blessing to collect at our doorstep. Part of the reason for this is that I keep a pretty well-stocked pantry. And by ‘pretty-well stocked pantry’ I mean if you saw my basement you might think I was a doomsday prepper. I’m not. I’m just hungry and capricious and live in the middle of nowhere and want to satisfy my every food whim without driving to Timbuktu or Rochester to get little things. It pays off, though, my people! When friends or family call and say they will be in the area, I can easily exclaim, “Stop by! I’ll make dinner!” and actually mean it. I personally can a ton of produce myself throughout the summer, filling about five hundred or so jars of various sizes, but even so I can’t get to it all. Del Monte® fruits, tomatoes, and vegetables help fill in the gaps that were left by what my garden failed to produce or I couldn’t buy at farmer’s markets. For instance? My sorry old garden didn’t turn out one single tomato this year. Thank goodness for Del Monte® tomatoes. Most of what Del Monte cans (just about 90%!!) is grown right here in the United States and packed at the peak of ripeness to lock in nutrients and flavour which makes me one happy camper.
Bonus: 95% of what they can is preservative free. 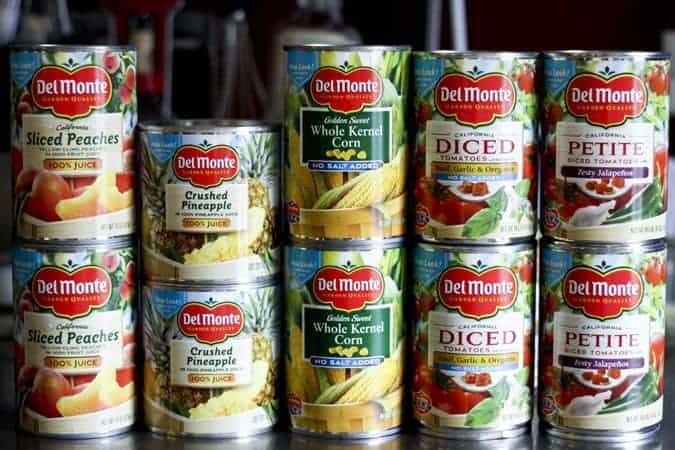
Having a pantry well stocked with garden quality ingredients is like having shelves full of ideas. What do you think when you see those cans? I think peach cobbler, pineapple salsa, corn and black bean dip, Italian style tomato soup, and restaurant style salsa. Now how about that for inspiration in feeding unexpected guests? That’s probably a grand total of about $10 worth of cans, which makes that laundry list of deliciousness economical, too. Partay at my house! If you’d like to see some other great ideas for stocking garden quality™ canned fruits and vegetables in your pantry and get more information on the Del Monte® family of products, please hop on over to their facebook page and ‘like’ them!
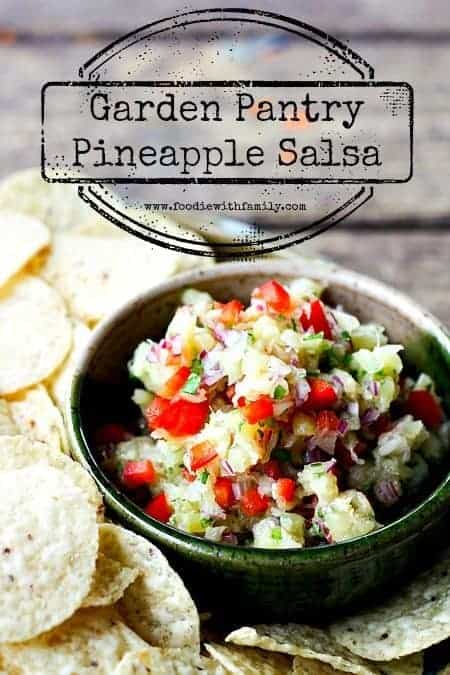
The recipe I’m sharing today is a classic in our family. It came about when my stepmom talked me off of a culinary panic cliff when the mangos I had purchased to make mango salsa were mealy and gross. She suggested I replace the nasty mangoes with cans of crushed pineapple, which -she pointed out- would also save us a little work by being already cut up and bite sized. Gosh, but she was brilliant. We all liked it so much that we made sure we had ingredients for it at all times. It is a chameleon, being fantastic as a chip dip OR served spooned over grilled, roasted, broiled or fried fish, chicken, pork, or beef. It’s also a light, refreshing topper for beans and rice or black bean soup or chili, as my stepmom also did regularly. Our family is a little obsessed with it… We hope you love it, too!
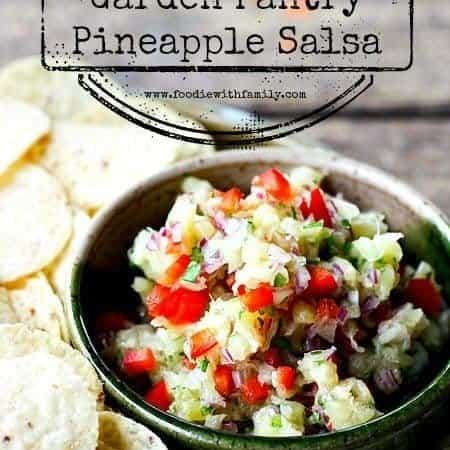
Garden Pantry Pineapple Salsa {5 minute recipe}
Rate RecipeIngredients
- 1 can Del Monte Crushed Pineapple in 100% Juice 15.25 ounces, not heavy syrup!
- 1/2 red bell pepper stemmed, seeded, and diced
- 1/2 small red onion peeled
- 1/2 jalapeno pepper stemmed, seeded, and minced
- 1/4 cup packed fresh cilantro or parsley leaves
- 1 lime juiced, or 2 tablespoons bottled lime juice
- 1 clove garlic peeled and minced or pressed
- 1/2 teaspoon kosher salt
Instructions
- Don't blink or you'll miss how to make this.
- Strain the pineapple juice away from the crushed pineapple in a fine mesh strainer. (Save the juice for smoothies.) Stir the pineapple and rest of the ingredients together. It can be served immediately, but flavours improve if allowed to sit together for 20 minutes in the refrigerator if time allows. Leftovers taste best within 3 days, but are safe to eat for up to a week after stirring together.
- Serve as a chip dip or spooned over grilled/broiled/roasted fish, chicken, pork, or beef. It's also wonderful on fish tacos, with beans and rice, or on black bean chili.
Nutritional information is an estimate and provided to you as a courtesy. You should calculate the nutritional information with the actual ingredients used in your recipe using your preferred nutrition calculator.
did you make this recipe?
Make sure to tag @foodiewithfam on Instagram and #hashtag it #foodiewithfamily so I can check it out!


Reader's Thoughts...
Mel says
tweeted
https://twitter.com/MelindaJoy926/status/421102951487127552
Allison Downes says
Tweeted:
https://twitter.com/lolaviolets2010/status/414298527246721024
lola_violets_2010{at}yahoo{dot}com
Allison Downes says
I love stocking up on tomatoes and green beans. Thank you for the opportunity to win this!
lola_violets_2010{at}yahoo{dot}com
Tabathia B says
tweet
https://twitter.com/ChelleB36/status/413458124797149186
tbarrettno1 at gmail dot com
Tabathia B says
Canned creamed corn, peas and pineapples
tbarrettno1 at gmail dot com
Thomas Murphy says
https://twitter.com/thomasmurphy40/status/413421332689616896