Visit our Bread Recipes page for more fantastic homemade breads!
Bread with soup. Bread for toast. Bread to sop up the last streaks of sauce or gravy or pan juices. I suppose you might be able to survive without bread, but you sure can’t live without it. A big, fat, puffy, chewy, golden loaf of homemade bread is just about the best thing that could possibly happen to your day.
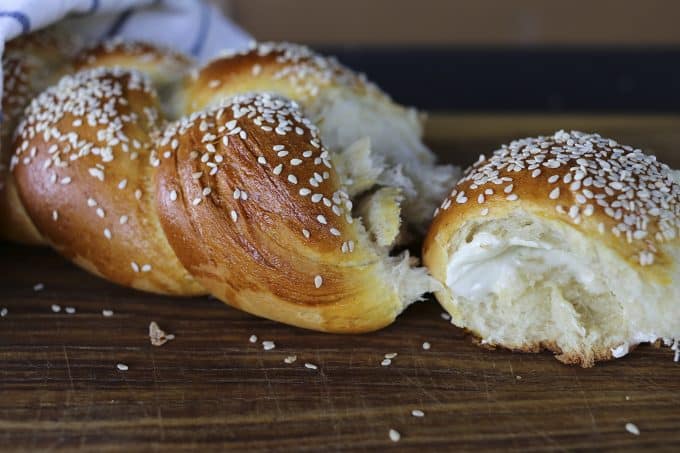
This is not one-hour or no-knead, but is so worth your time. This is another one of those foods that make you want to gnaw off your own foot while it’s cooking; It smells so good that you just can’t help yourself. When you tear a hot corner from this loaf and watch a cold pat of salted butter melt down into the soft crumb you’ll go weak in the knees. Assuming you haven’t eaten past your knees, that is…
Fresh from the oven and ripped into hunks, this bread is exactly what you want to sop up soups, sauces, dressings, gravies and pan juices. If you are a patient, forbearing, big-picture type person and you let it cool completely, this slices beautifully for sandwiches or toast.
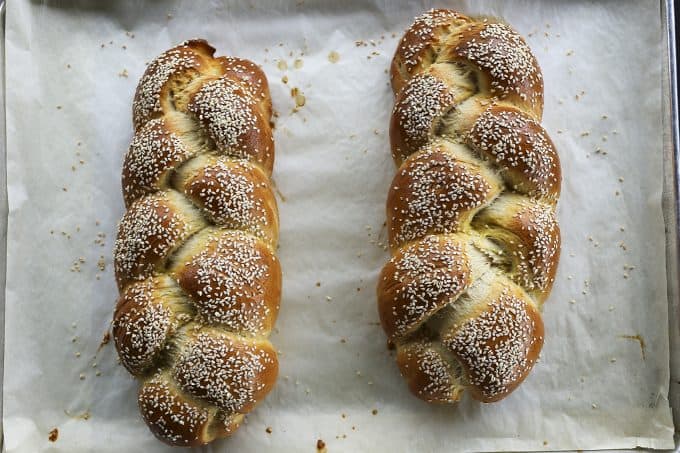
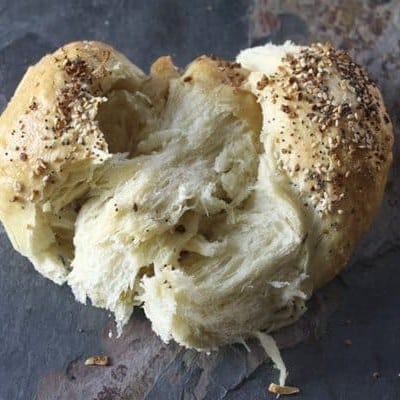
This is The Minions’ favorite bread. They like that it yields two mega-sized loaves. They love that I top one with just sesame seeds and the other with sesame seeds, poppy seeds, onion flakes, and garlic flakes. They live for the times I tell them they can tear off industrial sized pieces from the loaf that’s dressed like an everything bagel. Butter is applied liberally. There are animal noises. Crumbs fly. They wait, slightly more patiently, for the sesame loaf to cool. They slice quarter-inch thick pieces of bread and like them toasted on one side with a top-hat of blueberry jam.
On the nights that I make them wait, they mill around the kitchen aimlessly, standing silently behind me like little ghosts waiting… waiting… waiting… making their way to the table and half-heartedly helping themselves to the whatever-else-I’m-serving then pouncing when the bread basket gets to them.
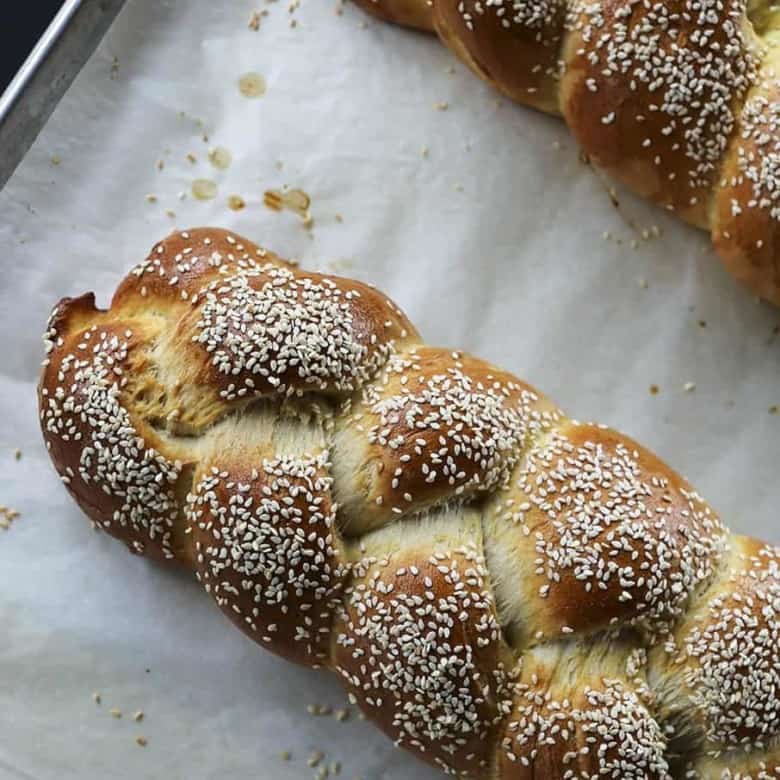
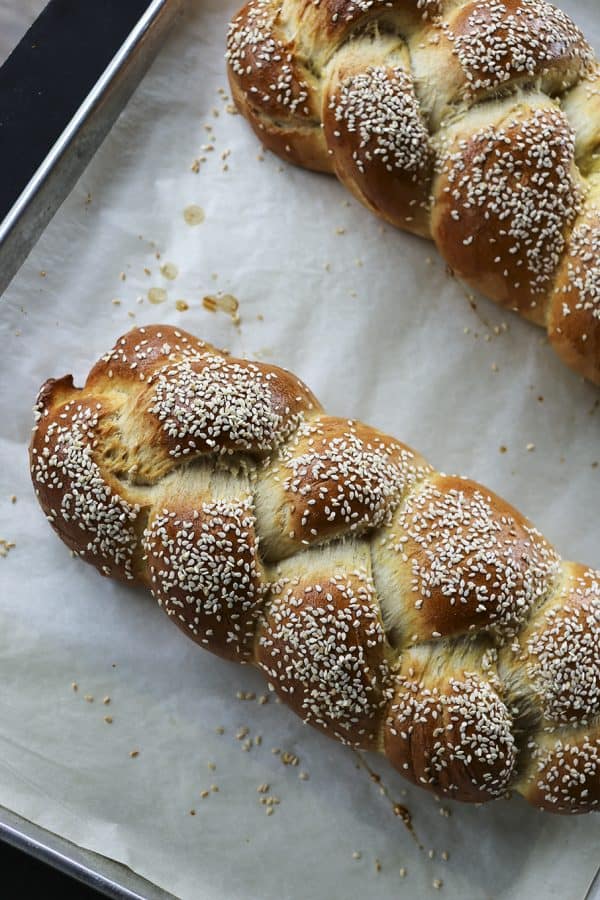
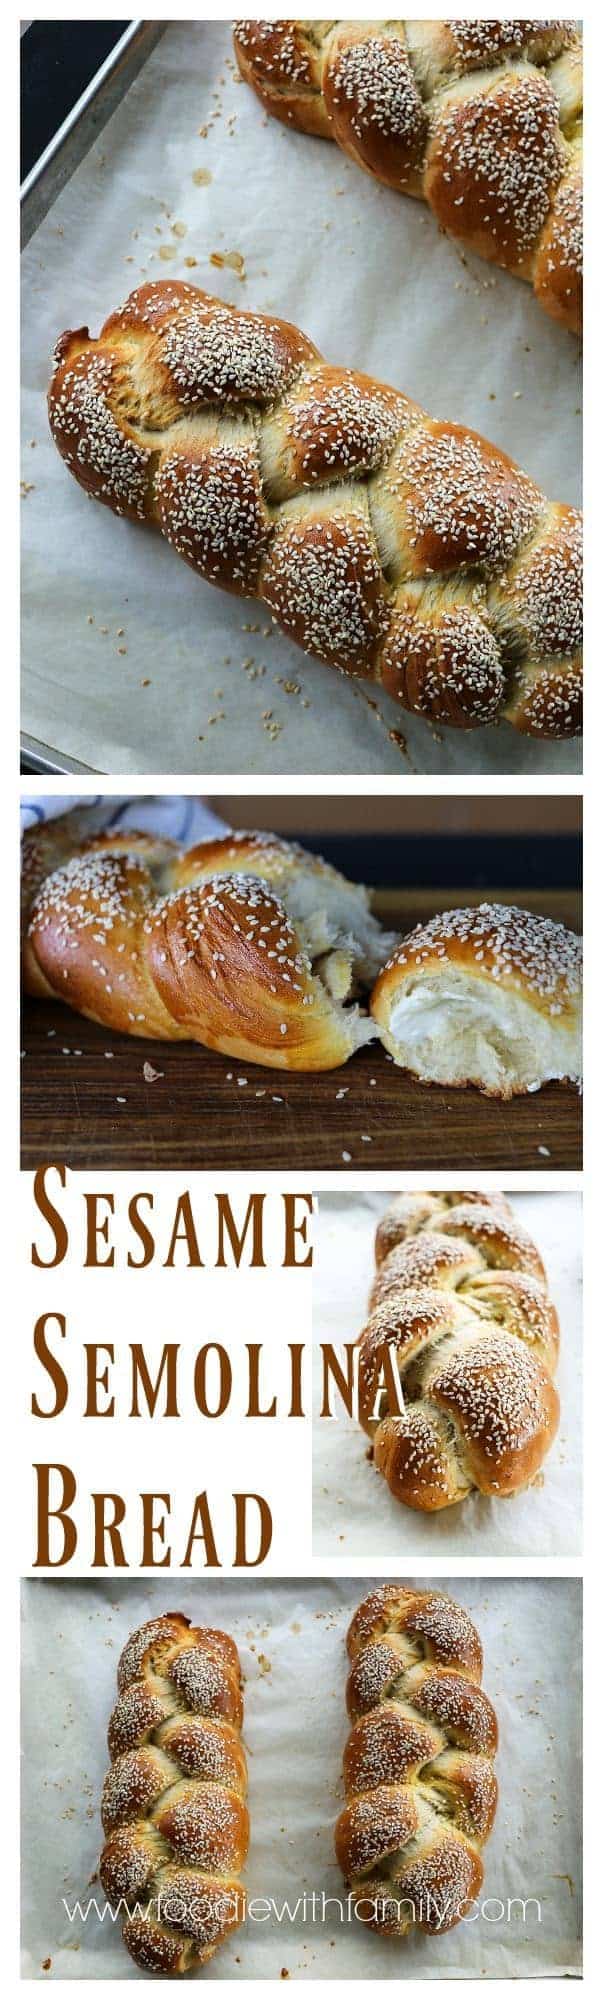
This is a bread of beauty; golden brown, crispy crust topped with crunchy seeds (and perhaps spices) and a soft, yielding interior. It is another gem of a recipe from the King Arthur Flour Company and their top notch baker’s test kitchen.
I’ve been making this bread for somewhere near ten years- ever since this recipe appeared printed in the pages of their horribly tempting catalogue. It’s a hard recipe to mess up beyond edibility. I’ve accidentally left the dough to rise overnight. I’ve hurried it along and forgotten the second rise.
I’ve brushed and topped it with exactly nothing at all. I’ve substituted bread flour for all-purpose flour out of necessity. And every single time it’s wonderful.
It’s a very forgiving bread to make if you’re nervous about working with yeast or dough, as I have accidentally proven time and again.
Here’s a comforting bit of knowledge about yeast. If you don’t have a warm place to let the dough rise, don’t worry! It will still rise, it’ll just take longer.
Sometimes much longer. Just be sure to keep it lightly covered to prevent the surface of the dough from drying. Do you want to see how very easy the whole process is? Watch this quick video!
Please try this. Pretty please. With sesame seeds on top.
Sesame Semolina Bread
Gently adapted from King Arthur Flour Baker’s Catalogue.
Scroll to the bottom for an easy-print version of this recipe!
To Shape the Dough:
Turn the dough out onto a clean surface and form into a neat mass. Divide the dough in half, then divide each half into 3 pieces. Cover three of the pieces with a towel while working with the other three.
Pat one piece into a rough oval. Use the side of your hand to press an indentation along the length of the dough piece.
Fold the dough together along the length of the indentation.
Roll lightly with the hands to form a thick rope between 12 and 14 inches long. Repeat with the other two pieces so that you have 3 ropes of roughly equal length. Line them up in parallel with the ends facing you.
To Braid the Dough:
Gently grasp the end of the rope on the far left. Lift it to about the center, leaving the far end on the counter, cross it over the rope nearest to it and lay it down. Now grasp the end of the piece on the far right and lift it to about the center, leaving its far end on the counter, cross it over the (now) center rope (which is the first one you moved) and lay it down.
This is the manoeuver you will repeat – far left over center, far right over center, and so on- until you have ends too short to continue. At that point, pinch the ends together and tuck under the braid. Now go back to the center of the loaf and finish braiding the loaf toward the top. When you reach the ends, pinch together and tuck under.
The whole process looks like this:
Braided Semolina Bread
Ingredients
- 4 cups all-purpose flour 1 pound, 1 ounce, by weight
- 2 cups semolina flour 11 1/2 ounces, by weight
- 3 teaspoons SAF or instant yeast
- 3 teaspoons kosher salt
- 4 tablespoons sugar or non-diastatic malt powder
- 4 tablespoons extra virgin olive oil
- 2 cups lukewarm water 16 ounces, by weight or volume
- 1 beaten egg
- Optional Toppings:
- Sesame seeds
- Poppy seeds
- Onion flakes dehydrated
- Garlic flakes dehydrated
- Coarse salt
Instructions
To Mix Dough By Hand:
- Add all ingredients except the egg and toppings to a large mixing bowl and stir together with a sturdy wooden spoon until you form a shaggy but cohesive dough. Let the dough rest for 30 minutes, covered with a clean towel. Turn out onto a lightly floured counter top and knead until smooth and elastic, about 10 minutes. Transfer dough to a clean bowl, cover with a damp towel and let rise in a warm, draft-free place until doubled in size, about 2 hours.
- !To Mix Dough By Stand Mixer:
- Add all ingredients except the egg and toppings to the work bowl of your stand mixer fitted with the dough hook. Turn mixer onto the lowest setting and mix until a shiny, elastic dough forms. Remove the bowl from the mixer, cover the bowl with a damp towel and let rise in a warm, draft-free place until doubled in size, about 2 hours.
- !To Mix Dough By Bread Machine:
- Add all ingredients except the egg and toppings to the pan of your bread machine that has been fitted with the dough paddle(s). Set the bread machine on the dough setting and press start. When the cycle is completed, proceed with shaping...
- !To Shape the Dough:
- Turn the dough out onto a clean surface and form into a neat mass. Divide the dough in half, then divide each half into 3 pieces. Cover three of the pieces with a towel while working with the other three.
- Pat one piece into a rough oval. Use the side of your hand to press an indentation along the length of the dough piece. Fold the dough together along the length of the indentation and roll lightly with the hands to form a thick rope between 12 and 14 inches long. Repeat with the other two pieces so that you have 3 ropes of roughly equal length. Line them up in parallel with the ends facing you.
- !To Braid the Dough:
- Either line a half sheet pan with parchment or set a baking stone out to use.
- Gently grasp the end of the rope on the far left. Lift it to about the center, leaving the far end on the counter, cross it over the rope nearest to it and lay it down. Now grasp the end of the piece on the far right and lift it to about the center, leaving its far end on the counter, cross it over the (now) center rope (which is the first one you moved) and lay it down. This is the manoeuver you will repeat - far left over center, far right over center, and so on- until you have ends too short to continue. At that point, pinch the ends together and tuck under the braid. Now go back to the center of the loaf and finish braiding the loaf toward the top. When you reach the ends, pinch together and tuck under. Transfer the braid to the parchment lined sheet or the baking stone. Cover the loaf lightly and let rise in a warm place until puffy in appearance and about doubled in size.
- Preheat oven to 400°F. Whisk the egg until very loose. Paint generously onto the risen bread braids and sprinkle the braids with desired toppings.
- Bake for 18-26 minutes or until your preferred shade of golden to deep brown and firm on top. Turn the oven off, prop the door open a little (two inches, if you can make your door behave) and let cool for at least an hour. Or tear into the loaves with your teeth. I won't tell.
Nutrition
This post was first published March 4, 2011.
Darlene says
I love KAF, particularly their bread flour, and their test kitchen blog, Baking Banter. Bread baking is my (recently new) favorite hobby and I’m always looking for new ones to try. Thanks!
Ethan says
Foot-gnawing bread is pretty good bread! Me and yeast are still learning how to be friends, but it does sound great!
Melissa says
Best, easiest bread ever! Truly, I cannot believe how easy this was. The dough was a dream and the finished loaves tasted amazing. I will make this again, you can count on it.
Thank you. ♥♥
Elizabeth says
These look stunning! I’ll bet they were delicious too. I’ll be sure and give this a try!
sw says
My book club, husband, and son (well, me too) all thank you. It was great!
Tracy says
I’ve been baking bread for many years now, and the best bread that I make and the most successful batch is usually when I prove the yeast before adding it in. Do you prove your yeast?
Madelyn says
If you use instant yeast you do not proof it, you can use dry yeast and proof it. I’ve used both yeasts and the result is the same.
SMITH BITES says
on. my. way.
P the great says
I heard a rumor that somebody’s going to be [edited for family website content] due to this bread.
It’s clearly a winner.
maria says
Okay, I am trying this beautiful bread today. My problem I am seeing is that the dough looks dry. That seems to be the trouble I have with the humidity here in SW Florida. Any suggestions, also especially with the water. I used my filtered refrigerator water should I use bottled spring, purified or distilled water?
Hoping to have the crusty soft warm semolina seedy taste again that I had in Brooklyn, NY. Missing home for the food. Thank you.
Rana says
Delicious and beautiful bread. I made it tonight hoping for a great recipe in which to use semolina flour. This recipe is delicious. My bread and photo look like the ones posted (minus the seeds as my children don’t like that addition). Because of the 4 Tbsp sugar, the bread has a hint of sweet, but not too much. The crumb is on the finer side, but not quite as fine as challah, or other egg breads. I make all our family’s breads; this recipe will be well used in our home.
Valerie says
I’ve always wanted to make our own bread and am excited to try this recipe BUT we like using whole grains. Can we substitute for them and how?
Thanks for any tips. 🙂
Rebecca says
Hi Valerie! This particular recipe is geared toward being made specifically with unbleached, unbromated white flour and semolina flour. I have not experimented with subbing in whole grains. If you give it a shot, I’d recommend starting with a small proportion of whole grain flour to regular all-purpose or high-gluten flour. Keep working your way up, batch after batch, until you find that ‘threshold’ at which it maxes out on how much whole grain it can support.
Frances says
Just made this bread last night – the best semolina bread I have ever had!!! The dough only took one hour on the first rise – I put the dough into my warm oven – no warmer than 100 degrees and it rose perfectly. I am keeping this recipe for all my future loaves of semolina bread that I will be making. Thank you for sharing this wonderful recipe !!
Rebecca says
You’re so welcome, Frances! Thanks for letting me know it went over very well with you! We surely love this as well!!
Ginny says
This bread is unbelievably good. I bake a lot, and this is becoming part of the regular rotation. The dough is a pleasure to work with. Thank you so much for this excellent recipe!
Rebecca says
Thank you, Ginny! The dough is a dream, isn’t it? It almost makes itself into bread. 😀
Chocolate Lady says
First off ~ I love your website! You have fabulous recipes, and often I find myself laughing aloud as I read your commentary.
I recently ordered diastatic malt powder from Amazon to make bagels. Could I use that instead of non-diastic as your recipe calls for?
Thank you!
Rebecca says
Thank you, Chocolate Lady! You can certainly use diastatic malt powder for this!
rhonda ahrens says
it is snowing outside today, April 16, 16 here in Colorado. Spring time in the Rockies is always erratic, I awoke to kids soccer and LAX games being canceled and wanting bread. Thankfully I bought semolina flour last time I was at the store. Had King Arthur’s flour but forgot it was tucked in the pantry, just made this with an organic unbleached flour I found at Costco and the Semolina flour. It is almost done and the house smells amazing. We braided it and added the poppy seeds, salt, onion and garlic flakes. Doubt we will wait an hour for it to cool. So easy! Thanks for making our snowy day fun.
Rebecca says
That sounds like a perfectly perfect snow day activity!!
Katrina says
Such a perfect looking bread! I love it!
Rebecca says
Thank you, Katrina!
Melissa says
If I don’t have a warm place to let the dough rise, I just preheat my oven for 60 seconds or so, turn it off and put the bowl of dough in the oven to rise. If you let the oven heat for just a short amount of time it won’t be hot enough to kill the yeast. That way I don’t have to wait for hours for the dough to rise. If your oven is occupied, you could also potentially set the bowl of dough in a larger bowl of very warm water.
Rebecca says
That’s a very good way to proof the dough when your house is chilly!
Linda says
Your clothes dryer is a great warm place for your dough to rise too! Run it for a minute or so, then let your dough rise inside the nice warm dryer.
Rebecca says
This is a great idea, Linda!
Connie says
What is the difference between diastalic and non – diastalic malt powder?? I love reading your blog and enjoy the recipes. Thanks for sharing.
Rebecca says
Diastatic malt has enzymes and non-diastatic malt doesn’t. Short version, non-diastatic is for flavour… it’s a little molasses-y. Diastatic malt is okay in baking, but it’ll make the dough behave somewhat differently because of the enzymes. Both will impart the same sweetness, but you would have to watch dough made with diastatic malt as it will rise differently. And thank you!
jim kappesser says
Is that the same as the difference in powdered malt for beer fermentation, and malt grains for flavoring beers? I have crystal malt grain for flavor adding to an ale. If I grind it into a powder, would it be a non-diastatic malt? Either way, I’m going to bake some bread, this time w/ semolina. Thanks for the recipe!
Sarah says
This turned out absolutely gorgeous – dough was super-easy to work with and made beautiful braids! One I added poppyseeds and sesame to, the other I added cardamom and pearl sugar. Toasts beautifully, too. Thank you for this gem of a recipe from a fan in Japan!
Rebecca says
Thank you so much, Sarah! The sugar and cardamom combo sounds absolutely lovely! Almost a little Finnish, eh? I’m so glad you like it! 😀
umar ghuman says
That was one of the most elegantly done food videos! Thank you 🙂
Rebecca says
My goodness, thank you, Umar!
Kathryn says
This turned out great! And I’m not even a great bread braider. I kinda winged it and it still turned out!
Rebecca says
Go, Kathryn!! 😀
Stephanie says
This bread is incredible. Made it last weekend, making it again this weekend. Easy and so delicious. Thank you!!
Isaac says
Look awesome. Will try to bake this weekend.
Steven Spungen says
I am a novice baker. What does the indentation do and why is it necessary before you roll the individual pieces before braiding? Thanks!
Rebecca says
That’s a great question, Steven! The purpose of the indentation is to give you a more uniform piece of dough to shape and roll. It makes the ropes for the braid more even when you roll them out.
Roni Jordan says
Made these today using Bobs Red Mill Artisan Bread Flour and Semil is flour. Superb breads, love having this now in my repertoire. Great tip on making the dough snakes for braiding – will use this the next time I bake challah.
Roni Jordan says
sorry for ty[po – couldn’t correct. Meant to say Semolina flour.
Nicole says
I made this today for Christmas Eve dinner. It was so easy to make and smells delicious. Can’t wait to try it!
Nancy says
I’m in process of mKING this bread now. The dough is very dry and heavy. I used the weight measurements. It was not glossy. It’s rising now. Hope it works out.
Rebecca says
Without being there, it’s hard to know what happened. I hope your bread turned out nicely! Do you know what altitude you’re at? Was it humid/dry where you are? What’s your ambient room temperature?
Rebecca says
Hey Nancy- How did this end up for you? I’m so curious about what went wrong for you.
Jodie says
Hello, could you use strong bread flour instead of all purpose?
Many Thanks
Rebecca says
Hi Jodie- You most certainly can, but I’d advise some extra kneading because of the higher protein count!
Karen says
When I was a kid my dad would take me to an italian deli where we would buy olives and the most wonderful rolls, and I was never able to duplicate that texture in my homemade bread. This recipe with semolina was exactly what I was looking for. I have to say I was a little concerned with the recipe when I saw how dense this dough was, and it was a workout to knead, but it turned into the most beautiful, soft, chewy delight. Thank you for sharing
Rebecca says
Thank you so much, Karen! I’m so glad that it helped you find the way to feed that food memory!! And thank you, too, for taking the time to rate the recipe. I do appreciate it!
Roni Jordan says
I have made tis bread so many times I cannot count. Two loabes just out of the oven. I bake for 22 minutes on convect and take them out right away to cool. We call this Italian cahallah.
Roni Jordan says
I have made this bread so many times I cannot count. Two loaves just out of the oven. I bake for 22 minutes on convect and take them out right away to cool. We call this Italian challah.
Rebecca says
I’m so glad you love it, Roni! Thank you so much for taking the time to rate the recipe, too!
Gina says
Ok, otherwise very bland.
Vinny Boombatz says
Hi, bread looks beautiful and reminds of the bread I used to get on Long Island at Iavornne Brothers. Anyway I’ve made it twice and followed the instructions exactly. I proofed it in the oven with hot water underneath to raise oven temp to high 70’s – 80’s. After the first proof the dough comes out wet and the only say I can work with it for form the ropes is by using additional flour. From the video it looks like the roads should be drier and easy to work with. After formed and proofed second time I brush on the egg and sesame seeds. I put it in the oven and it looks ok after baking, but I don’t see any separation of texture among the braids….its all one common loaf inside.
Can you provide me any tips on how I might be more successful making this beautiful bread? thanks in advance.
vinny boombatz says
ropes NOT roads
Rebecca says
Hi Vinny- Let’s see if we can trouble shoot this for you. Is your dough very slack and wet before the first proof? Are you covering the pan before putting it into the oven with the pan of hot water?
Vinny says
Thanks Rebecca. I use mixer with dough hook 8 mins. Pretty much a ball when it’s done. I cover mixing bowl with towel and put it in oven. On a rack below I put a Pyrex pan with hot steamy water on a lower rack and closed door with temp inside oven raising to 88 degrees and dropping to 78 in 2 hrs. Then I take it out to make the loaves. Very hard to work with the dough. Very wet and hard to roll with out adding flour.
Rebecca says
Okay, Vinny- Is it a cohesive ball that pulls away from the sides of the bowl and doesn’t adhere at all? If it is, I suspect the issue may be in your super-proofing in that hot an oven. I think the combination of the super hot temp (I like this bread best when proved a solid 15 degrees cooler than your starting temp) and the steam environment. I have never had my dough go from being cohesive to slack, and that is the only thing I can think of that’s doing this to your project.
Vinny says
Thanks Rebecca. I will try proofing without the steam. Thanks for your help and advice!
Olga Dziubaniwsky says
Curious – what is the purose of making the indentation along the length of the dough ropes?
Olga Dziubaniwsky says
Curious – what is the purpose of making the indentation along the length of the dough ropes?
Rebecca says
It’s not exactly crucial, but it helps you to form a more even rope. It’s really an aesthetics thing. It does contribute a bit to overall even cooking, but not enough to worry about if you don’t choose to do it. 🙂
Janine DelGiorno says
What if I can’t vent the oven? I have twin 2 yo toddlers and they do not listen well enough to leave a hot oven open. Any suggestions?
Rebecca says
In that case, I definitely recommend putting it up on a cooling rack outside of the oven! It isn’t worth burning little fingers!
Lotte says
Wonderful bread recipe! At first, the dough seemed way too dry, even after I added an extra tablespoon of water. But I decided to let it be rather than trying to add more. I’m so glad I did. After resting and then kneading, it came together into a very nice, smooth, pliable dough. It was warm, so it didn’t need the full two hours to proof. Very easy to work with while braiding, and it baked up into nice, crusty loaves of bread. I’ll definitely be using this recipe again
Rebecca says
I’m so glad you loved it, Lotte! It’s a dough that quietly, and slowly hydrates vs. one that looks smooth and elastic right away. I’m glad you took the time!!!
TIna says
After I form it into loaves can I refrigerate and bake the next day?
Rebecca says
Hi Tina- I would not… This one has enough yeast that I’m not sure a long, slow ferment in the fridge is the best idea.
Ashleigh says
Hi,
So you do not recommend letting it slow rise in the fridge or you mean only once its shaped? I am trying to figure out solutions how i can make a few but only can bake one at a time…
Rebecca says
Hi Ashleigh- I hear you, but you might be better to do them in batches. Once you pop it in the fridge, you’ll need to bring it back to room temp and allow it to get puffy for a while (a time frame i can’t predict because of a variety of factors). It is such an easy dough, my recommendation if you can only bake a little at a time is to have staggered batches of dough started.
Carolyn Brodersen says
REALLY love this–both the recipe and the extensive photos–and I get rave reviews when I make it. Thank you so much!
Rebecca says
You’re very welcome, Carolyn! Thank you for taking the time to rate the recipe and let me know. 🙂
Susan says
Absolutely loved this bread and it was so easy to make. I used 2 c all purpose and 2 c whole wheat flour, as well as the required amount of semolina. I used chia seeds and hemp heart seeds on top of one loaf and added some rosemary to that on the second loaf. My hubby described this as almost pretzel like.
I will make this again.
Rebecca says
I’m so glad you loved it, Susan. Thanks for taking the time to rate the recipe. I appreciate it.
Timmythehound says
What is a good internal temperature to bake the bread to?
Can we add egg to the dough like in other braided breads?
Rebecca says
Hi Timmy- 190°F is the perfect internal temp for this bread! And adding egg to the dough… do you mean a beaten egg to the dough? Or braided around the eggs like in Italian Easter breads? I wouldn’t add egg directly to the dough- it’s a lovely texture as is. 🙂 As for braiding around it, I suppose that’d work. 🙂
Cindy says
Currently going through the steps to make this semolina bread, I only had bread flour on hand so I substituted it for the all purpose. I only just now skimmed through the comments and noticed someone else mentioned using bread flour and you suggested needing for a longer time due to higher protein, but I already started proofing the dough. Is it too late to put it back on the stand mixer and let it knead a bit longer? I’m not exactly sure how it should look when it’s done kneading and am afraid to overknead. How many minutes would you say it takes for the stand mixer to knead the dough after mixing all ingredients? Sorry this was long winded, it’s my first time making bread.
Rebecca says
That’s okay, Cindy!! I’m sorry I didn’t see this sooner, but you would have been a-okay to let it keep proofing! Please check back in with me and let me know what you did and how it worked for you. I’m so thrilled that this was the recipe you used for your first go-round of bread baking!
Shira says
Hi, Do you think it’s possible to substitute the yeast with sourdough starter? Have you ever tried it?
Rebecca says
Hi Shira- I’m sure you can, I’ve just not tried it personally! It’d be a bit of a different process, for sure. If you play around with it a bit, please let me know how it goes for you!
Shira says
Ok, I’ve made it. Subbed the yeast with 160g %100 hydration whole rye sourdough starter. Bulk fermented in the fridge over night, proofed under the oven light for an hour. Everything else was done per your recipe. I’m pretty new at it so my hydration was a bit off and a bit too sticky for the shaping but it came out tall and delicious! Crusty, soft and chewy on the inside, perfect for pulling chunks or slicing. Thanks!
Rebecca says
That sounds spectacular, Shira! I may give that a go myself.
Chris says
My braids came out great, but when I let it double, the braids ripped a little. Was the dough too dry?
Rebecca says
Hi Chris- The likeliest culprits when braided bread does that are both braiding a little too tight and/or under-proofing the dough. Did the bread taste good?
Francesca says
The dough looks dry. Is that normal? Also, I didn’t proof the dry yeast will that make a difference?
Rebecca says
Hi Francesca-
I’m afraid I can’t tell you if it looks normal without a photo. If you’d like to email me a photo, I’ll happily look it over. 🙂 My email address is available on the About page.
Karen says
Making your bread this morning. I did not see weather or not to bake bread on sheet pan or stone. I did have to go bake and look at your pictures. Annoying.
Rebecca says
Hi Karen- Luckily, either of those options would have yielded a delicious bread. I’ll go pop a note about that in the recipe card.
Peggy says
Hi is it possible to bake half the proportion by halving the recipes ? Any quantity needs to be adjusted differently ? Thanks.
Rebecca says
Hi Peggy- I’d say halving it will work great. 🙂
Keri says
I found it dense and not as soft or airy as I hoped. I don’t have a stand mixer.. maybe I kneaded and rolled too much? Otherwise delicious!
Rebecca says
Hi Keri- You may have overkneaded it, but I’d first wonder whether you measured by volume (in measuring cups) or by weight (on a kitchen scale.) Which of those did you employ? That may help us nail down why your dough was dense. I’m guessing that you used measuring cups.
Fabiana says
I made this last week and I will make it again tomorrow morning. This was outstanding. Thank you so much for sharing! 😘❤️
Rebecca says
Thank you so much for taking the time to rate the recipe and let me know you love it, Fabiana! I’m so glad!