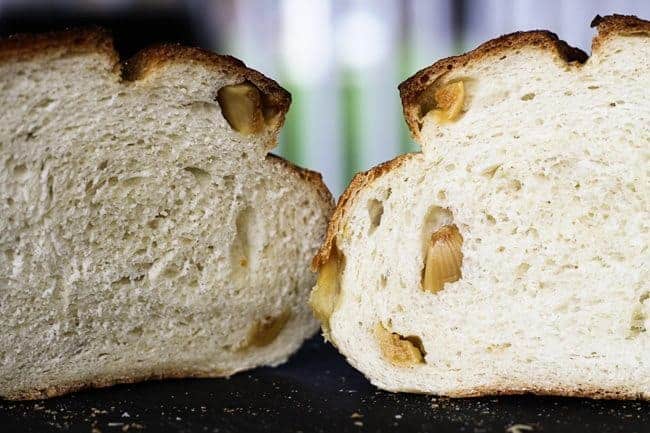
Roasted Garlic Rustic Sourdough Boule
A classic, chewy, full-flavoured, rustic sourdough bread gets a little dressed up with roasted garlic cloves that are rolled into the dough when it is shaped. After baking, the loaves are brushed in extra virgin olive oil and sprinkled with super-fine sea salt.
Recipe adapted from and with thanks to King Arthur Flour
Ingredients
- 1 cup ripe sourdough starter 8 1/2 ounces by weight
- 1 1/2 cups body temperature water 12 ounces by weight
- 2 1/2 teaspoons salt
- 1 tablespoon sugar
- 2 teaspoons instant or active dry yeast no need to dissolve either in water first.
- 5 cups King Arthur All-Purpose Flour 1 pound, 5 1/4 ounces by weight
- 1 cup roasted garlic cloves roughly chopped
Optional:
- extra virgin olive oil for brushing and super-fine sea salt for sprinkling over finished loaves
Instructions
- Whisk together the flour, yeast, salt, and sugar in a large mixing bowl (or the bowl of a stand mixer fitted with a dough hook.) Add to that the sourdough starter and water and mix with a bowl scraper, sturdy spoon or dough hook until a shaggy dough forms.
- Turn the dough out onto a lightly floured surface, flour your hands, and knead until the dough is smooth and elastic, about 8 minutes. Alternatively, you can use the dough hook to reach the same state. Place the dough in a lightly greased mixing bowl, cover with a clean tea towel or plastic wrap and let rise in a warm, draft-free place until puffy and marshmallowy in appearance and texture. If you gently poke a finger into the dough, an indentation should remain when your finger is removed from it.
- Turn the dough onto a lean counter, cut in half (don't rip it, pretty please!) with a bench knife or other sharp knife, and pat each half into a rough rectangle or oval that is about 1/2-inch thick. Divide the roasted garlic between the two dough shapes and spread evenly over the dough. Roll each piece of dough into a log starting with a short side.
- To form each piece into a boule or ball, gently tug and pull one coiled end toward the center. Tuck it in place, rotate the dough about 45° and repeat. Continue rotating, pulling and tucking toward the center until you've gone all the way around and your dough is roughly in a ball shape. Flip it over so the smooth side is up and nestle your hands around the dough with your hands at a 45° angle to the counter. Roll the dough between your cupped hands, alternating pulling with one hand and pushing with the other, tightening the dough ball as you go. When the surface is taut, carefully lift the dough ball and place it smooth side up on one side of a parchment lined baking sheet. Repeat with the remaining dough log, placing the finished ball so that there are at least 6 to 8 inches between the two. Cover them lightly with a tea towel and let rise in a warm, draft-free place for 30 minutes.
- While the dough balls are rising, preheat the oven to 425°F with an empty cast-iron or other heavy, oven-safe frying pan on the floor of the oven. Bring a pot of water to a boil on the stove top.
- Immediately before baking, use a sharp knife or blade to score an 'X' or scallop shape about 1/4-inch into the surface of the bread dough. This allows the bread to expand without tearing as it cooks.
- Working quickly, slide the parchment lined pan with the boules into the oven and carefully pour about 1 cup of the boiling water into the empty pan. Be cautious because this will generate a great deal of steam VERY quickly! Close the oven door immediately and set the timer for 20 minutes. After 20 minutes, remove the water pan from the oven, close the door and reset the timer for an additional 10 minutes.
- The bread should be deep brown, very firm and measure at least 195°F at the center of the loaf with an instant read thermometer. Transfer the finished loaves to a cooling rack. If desired, brush generously with extra virgin olive oil and sprinkle the surface with super-fine sea salt. Let cool completely before slicing.
- Store leftovers at room temperature wrapped in a tea towel.
Nutritional information is an estimate and provided to you as a courtesy. You should calculate the nutritional information with the actual ingredients used in your recipe using your preferred nutrition calculator.
did you make this recipe?
Make sure to tag @foodiewithfam on Instagram and #hashtag it #foodiewithfamily so I can check it out!