
My Mom -known around these parts as Nana- does a lot of things very well. She remembers the name of just about everyone she’s ever met, plays a mean piano and a killer game of chess, makes stupendous lumpia, and always delivers a hug right when you need one (even if you don’t know you need one…)
And Nana isn’t your average, ordinary Nana… To hear her grandkids tell it, she’s a bit magical. She talks to her garden, creek stomps, climbs trees, fixes boo-boos, spins fantastic tales, rides her bike down dirt roads at warp speed wearing a long skirt, engineers popcorn explosions, walks barefooted in the snow, drinks full-caffeine espresso as a nightcap, wrestles like a pro and cuddles better than a dog*.
*That last one comes from my fourth born. Believe you me, from my boy that is a monstrously huge compliment.
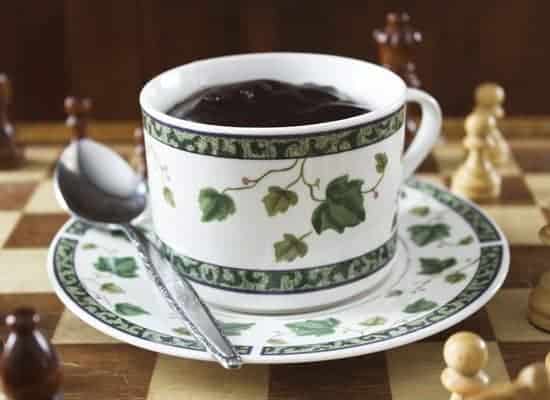
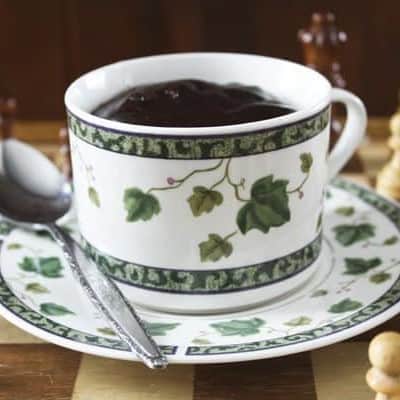
Nana also makes the world’s best hot chocolate. Oh, her hot chocolate. Oh, yeah. After a hard day of hopping through snowy fields like rabbits and swinging from icy branches there is nothing quite like Nana’s Spanish Style Hot Chocolate to warm you down to your toes. Nana’s hot chocolate is like warm velvet; It’s thick, rich, smooth, and sticks to your lips like pudding. It’s not too sweet. It’s the bees-knees*.

*Incidentally, even the bees are happy at Nana’s house. When they wander in, she gets a clean mason jar and gently returns them to their native habitat.
Nana makes hers thick, but drinkable, very much like the hot chocolate served with churros in Spain or in Italy or France. Sometimes, though, when the muse strikes, I thicken it up to the point where it’s strictly spoon-fare. When I go that far, I almost always gild the lily, as I am wont to do, and top with chocolate shavings or ground cinnamon.
Hot chocolate pudding. Can you imagine something more decadent? (Well, if you accidentally splashed a thimbleful of dark rum or brandy over the top, that might be more indulgent.) Once you have this under your belt, you never have to worry about what you’ll make for dessert. I regularly bust this out after dinner with friends, sledding parties, and necessary moments*.
*I have my necessary moments; Everyone does. I mean the moments when only chocolate stands between you and googly eyes and head-spinning and pea soup spewing.
When Nana wrote down the recipe for her hot chocolate for her grandboys, she included this instruction, “Think of Nana and warm hugs (and the icy creek!)” … And look out, ’cause Nana’s coming at you with a big, warm hug and she just might ask you to climb a tree.
Nana’s Spanish Style Hot Chocolate (Hot Chocolate Pudding)
Scroll to the bottom for an easy-print version of this recipe!
Ingredients:
- 2 cups whole milk
- 2-4 tablespoons sugar, or more, depending on sweet you like it (I prefer raw sugar for the caramel-like flavor it imparts here.)
- 4 tablespoons good quality Dutch process cocoa powder
- 2-4 tablespoons arrowroot powder or cornstarch (use less for a more drinkable product and more for a thick, pudding-like finish.)
Optional, for garnish:
- Whipped Cream
- Shaved Chocolate
- Cinnamon Sugar
- Graham Crackers, Waffles, or Pretzels for dipping
Whisk together the sugar, cocoa powder and arrowroot powder or cornstarch in a heavy-bottomed 2-quart saucepan. Take care to smash any lumps. Whisk the milk into the powder. The powder will not dissolve in the milk, so don’t worry. The goal is to simply to mix it at this point. Place the pan over a medium flame or heat and whisk constantly. Watch for the following changes. First, the powder will dissolve and it will begin to look like chocolate milk. Next, the mixture will darken and begin to thicken slightly; Take care to scrape the whisk across the bottom and sides at this point to prevent scorching. Finally, the mixture will become very bubbly and thick. When it reaches this point, remove the pot from the burner immediately.
Spoon or ladle immediately into serving dishes. Garnish as desired.
Nana's Spanish Style Hot Chocolate (Hot Chocolate Pudding)
Rate RecipeIngredients
- 2 cups whole milk
- 2-4 tablespoons sugar I prefer raw sugar for the caramel-like flavor it imparts here., or more, depending on sweet you like it
- 4 tablespoons good quality Dutch process cocoa powder
- 2-4 tablespoons arrowroot powder or cornstarch use less for a more drinkable product and more for a thick, pudding-like finish.
- Optional for garnish:
- Whipped Cream
- Shaved Chocolate
- Cinnamon Sugar
- Graham Crackers or Pretzels for dipping
Instructions
- Whisk together the sugar, cocoa powder and arrowroot powder or cornstarch in a heavy-bottomed 2-quart saucepan. Take care to smash any lumps. Whisk the milk into the powder. The powder will not dissolve in the milk, so don't worry. The goal is to simply to mix it at this point. Place the pan over a medium flame or heat and whisk constantly. Watch for the following changes. First, the powder will dissolve and it will begin to look like chocolate milk. Next, the mixture will darken and begin to thicken slightly; Take care to scrape the whisk across the bottom and sides at this point to prevent scorching. Finally, the mixture will become very bubbly and thick. When it reaches this point, remove the pot from the burner immediately.
- Spoon or ladle immediately into serving dishes. Garnish as desired.
Nutritional information is an estimate and provided to you as a courtesy. You should calculate the nutritional information with the actual ingredients used in your recipe using your preferred nutrition calculator.
did you make this recipe?
Make sure to tag @foodiewithfam on Instagram and #hashtag it #foodiewithfamily so I can check it out!


Reader's Thoughts...
Kim says
Have you ever made this in your vitamix from start to finish?
Rebecca says
I have not but that is a brilliant idea! I will try it soon! If you do, let me know how it goes for you!
April says
This looks amazing. Has anyone tried making this in the microwave?
April says
Well, you can’t make this just once, it’s so good! I loved everything about this thick pudding-like hot chocolate. I’m afraid it’s going to be a bad habit this winter 🙂 Thank you and Nana!
Rebecca says
You’re very welcome! And you’re so right. It’s not a one-time-only snack, is it? 😀
April says
Just stopping back to say that I also made this successfully in the microwave. I microwaved it about 3 minutes, stirring every 30 seconds. Yum.
Soliegh says
Spot-on description of Nana!! I can’t wait to try this!!
Erin Brown says
Whoops! Just made this by accident. Whoops again: drank (ate?) it allllllll. Holy cow yummy.
Jonathan says
Wow! I have finally found it… a recipe that has allowed me to approximate the amazing hot chocolate that I enjoyed all across Spain back in the summer of 2008! (Yes, summer… I didn’t care that it was 100 degrees, I was sampling the exquisite “chocolate caliente muy denso” at every turn! Ha, ha.) I have been trying for three years to achieve such thickness… and, with your recipe, I finally did it! Thank you so much for sharing this! Not only did I savor the hot chocolate, but also your lovingly written, splendidly eloquent tribute to Nana. Beautiful… just beautiful!
Pam says
Wonderful article and wonderful recipe. I just finished making it and I’m sitting down right now with a beautiful cup with whipped cream on top.
kate C. says
I made this tonight – I think I need to buy a better brand of cocoa for it though, because you can really taste it and I don’t think mine was good enough. It wasn’t as chocolately as I remember having in Spain. On a related note, I need to learn to make churros, or, ideally, a ‘churros-like’ substitute that I don’t have to deep fry. I tried plain donut holes from the grocery store because I really wanted the chocolate and we’re trying to sell our house so I don’t want the grease smell around. But it was about as good as you’d imagine it. Hmm…
oh well, thanks for the good recipe! I think with better cocoa it would be just wonderful!
Kelly says
A Friend made this for me yesterday and mentioned I find the recipe here! I will forever be in DaytonTime’s debt!
Jamie says
Actually, in this cold weather no I can’t think of anything better or more decadent! And it is so simple! Yay! Just toss on a few marshmallows or a big squirt of whipped cream, put on an old movie and yes I am so there!
meemsnyc says
This looks so divine!
Rene' says
I had hot cocoa like this in Italy about 18 years ago on a cold morning. I never expcted this but it was the most wonderful treat ever!!! Thanks so much for the recipe. And the Post was beautiful.
Carine says
Your chocolate pudding just caught my eye immediately. Nice post by the way.
Paula says
oh, this looks so delicious! I`m absolutely sure that`s really tasty!
Have a great time,
Paula
Maggie @ Vittles and Bits says
Nana sounds like one amazing lady! Love the story, AND her cocoa! Looks delicious 🙂
Miranda L. Collin says
Aww, so wonderful to read this and feel warm, loved, and longing for my Grandma’s in heaven.
Cathy Nations Shaffer says
This is truly beautiful,just like you.Momma
Amy says
Just beyond the warmth of your words, a light snowfall is dusting the Genesee Valley.
I imagine this sweetly written blog entry made your mom smile inside and out. I’d walk barefoot in the snow too..if only I had some Spanish Style Hot Chocolate waiting for me inside…
Amy says
My mom is Nana too! She’s known for playing a kick ass game of Candy Land, writing letters on a wee one’s back with her nails, and making the best apple pie and buttermilk biscuits. The bees are pretty happy at her place too – it must be a prerequisite to being a Nana. I’ll need to tell her to get on the Hot Chocolate Pudding bandwagon or she could lose her awesome Nana status.
Melissa says
Drip!
“*Incidentally, even the bees are happy at Nana’s house. When they wander in, she gets a clean mason jar and gently returns them to their native habitat.”
🙂
I should keep cocoa powder in my house. For “moments.”