


You know what’s coming Sunday. I know what’s coming Sunday. I’m just going to pretend that it’s National Finger Food Day because I’m not a big fan of the you-know-what-bowl. Dip bowl? Yes! Soup bowl? Undoubtedly. Chip bowl? And how! Superbowl? Meh. The Evil Genius and the Minions, however, adore all of the aforementioned bowls including the superlative one. And so it always has been and always will be a big deal around here. I cook accordingly.
I have, over the tenure of my marriage, developed some pretty mad finger food skills to match the festive mood. I have also, over my tenure as Foodie With Family, recorded quite a few of them here. So many, in fact, that I figured it was high time to do a little round up of my own. I found so much of it that I had enough to do split into three categories. Since we’re being all footbally*, we’ll divide it into: The Savoury Team (hearty party food), The Sweet Team (desserts and other sweet treats), and our Halftime Show (snacks). These dishes are all at the top of our list of foods that make us unspeakably happy while leaving one hand free for the remote. As an added bonus, they can all be either cooked or prepped ahead of time to reduce the amount of time you spend off the couch during the big game.
*Footbally. It’s a word, right?
Here is a list of sixteen of my best, most festive Superbowl worthy savoury, stick-to-your-ribs gnosh. All of these come highly recommended from our crew to yours.
Meat Lovers

Pretzel Wrapped Smoked Sausages with Cranberry Mustard
Chewy soft pretzels wrapped around miniature smoked sausages. Seriously. Can you think of a better finger food? I sure can’t. This is my family’s all-time, most-requested, best-loved, favorite snack/birthday/special occasion/pretty-please-mom-and-or-honey food. When served with homemade Cranberry Mustard, it achieves a whole new state of addictiveness and -dare I say it?- elegance.

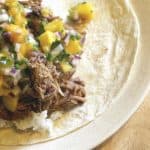
Slow-Cooked Cuban Pork
Let me reintroduce you to one of my all-time favorite recipes from here at Foodie With Family: Slow-Cooked Cuban Pork. This takes a little bit of advance planning, since you cook it overnight in the slow-cooker and let it chill before pulling it apart and reheating, but don’t let that put you off. It’s one of the most satisfying, simple and reliable recipes we’ve ever published here. It’s all that and a bag of chips. You can serve it the way we love best (the Cuban Pulled-Pork Tacos pictured above), stir it into soup, or try another of our favorites…

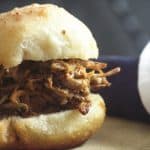
Barbecue Pulled-Pork Sliders
Tangy, slow-cooked pulled pork dressed in Carolina or Kansas-City Style Barbecue Sauce served on crusty garlic rolls. Yes, please. I don’t even want to tell you how many of these my husband can eat in one sitting.

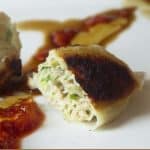
Chicken and Pork Potstickers
Crisp on the bottom, filled to bursting with a savoury chicken, pork, garlic, ginger, and savoy cabbage filling. Life can’t get much better than having a big, fat plate of these steaming chicken and pork potstickers in front of you. Well, okay. You could improve the scenario by serving with chili garlic paste, soy sauce and sesame oil, like we did here. I don’t even want to tell you how many of these I can eat in one sitting. It ain’t perty.

Barbecue Bacon Cheeseburger Stuffed Sandwiches
Speaking of stuffed things (both foods and me), these are high on the request list. If you can picture the flavor of a barbecue bacon cheeseburger cooked sloppy joe style then stuffed into a neat little package of soft, deep brown potato bread you’re on the right track. Happily, they can be made and frozen ahead of time for game day or snack attacks.

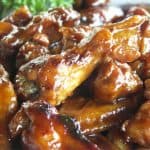
Sticky Chicky Bones
I’m reaching really far back with this one, but what Superbowl roundup is complete without chicken wings? These remain our favorite chicken wings. Packing an Asian flair with Sriracha and sesame oil, they’re sticky with honey, garlicky, gingery, and just slightly citrusy. Try them out this weekend. You won’t be disappointed.

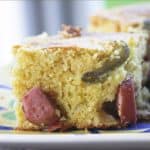
Corn Dog Bread
I know I’m not the only person in the world with a bonafide food crush on corn dogs. It’s just not possible. They scream party to me. Why not elevate them to a little something better than we’re used to getting at the county fair? My version is an ever so slightly sweet buttermilk cornbread with flavorful slices of quality franks (we prefer all-beef Kosher franks), chopped onions and candied jalapenos. Cut into squares and serve with the usual corn dog accompaniments; mustard and ketchup. And since I brought up ketchup, let’s play Yooper word association. I say ketchup, you say…

Yooper Pasties
All self-respecting Yoopers will have a platter full of piping hot pasties at their Superbowl parties. It’s winter, after all, and there is nothing that warms and fills you like a Yooper Pasty. What you have here is a flaky pastry crust filled with lean beef, potatoes, carrots, onions, and rutabagas flavored simply with black pepper and salt. The great debate north of the Big Mac -other than Lions or Packers- is whether to serve a proper pasty with ketchup or gravy. I’m in the ketchup camp. Where are you?

Spicy Chicken and Cheese Calzones
Ah calzones. When I was introduced to them, I thought of them as Italian pasties. Because I was cultured like that. In the years since, I have come to appreciate them as a wondrous thing all on their own. Crispy, chewy, pizza-like crust wrapped around melted cheese, tender chicken and crushed red pepper flakes make up my favorite take on the calzone. If you make them large, one will fill you to your tippy top. If you want to keep nibbling with no guilt, make mini-calzones. It’s a scientific fact that if it’s small you can eat more of them and consume less calories. Tell me I’m right. Now.

Ham and Swiss on Onion Rye Pizza
This pizza is, in a word, outstanding. The onion rye crust is pre-baked, making the process of baking a pizza faster than phoning for take-out. It goes without saying that a homemade pizza tastes infinitely better than 3/4 of the pizzerias out there, so what are you waiting for? Channel your inner pizza chef and throw down this rye crust topped with balsamic caramelized onions, shaved ham and Swiss cheese.

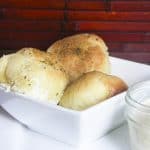
Ham and Cheese Bites
Did someone ask for more ham? I thought so! These crusty, herb-topped, butter-brushed rolls hide tender ham and gooey melted cheese and are served with a Dijon mayonnaise. I have been known to eat far too many of these, too.

Bacon and Swiss Rye Muffins
Is it a muffin? Is it meat? Is it a sandwich? Is it cheese? YES! It is. Oh, it is. This is a savoury bacon and swiss laden rye muffin. I’ll leave you alone with that thought for a moment.
Are you back? Good. Now make yourself some of these. You should be kind to you.
Soup’s On!

Loaded Baked Potato Soup
Just in case you wanted the perfect soup to serve with those Ham and Swiss Rye Muffins, look no further. Loaded Baked Potato Soup is exactly what it sounds like; a glorious baked potato base, pureed with chicken stock and butter, topped with all the things you love best on a baked potato. Who cares about snowstorms when you have a tureen (or in our case, a vat) of this soup on the table?

Taco Soup
Eminently kid- and budget-friendly, think of this soup as a basic black dress. Serve it plain or loaded with as many taco toppings as you can fit on without the bowl collapsing under the weight. Forget Coco Chanel’s advice to remove one accessory. Add it on, honey. Go all Liberace on this soup. It can handle it.
Vegetarian and Universally Beloved

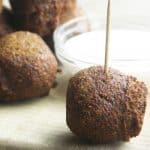
Falafel (Fried Savoury Chickpea Fritters)
Don’t you dare think vegetarian food is boring. Not in the presence of these splendid chickpea fritters. Crispy and deep brown on the outside, impossibly light and bread-like on the inside, you’ll not be able to eat just one. That’s a guarantee.

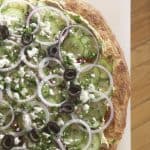
Mediterranean Hummus Pizza
What can I say about this that you can’t see from the picture? Not a whole lot, but trust me when I tell you that this cold appetizer pizza will keep everyone happy, not just the vegetarians. A pre-baked pizza shell is topped with creamy hummus, wafer thin English cucumbers, red onions, olives, crumbled feta cheese and chopped parsley. Don’t you feel happy just thinking about that?
I’ll meet you back here later this week for our Halftime Show and The Sweet Team. Superbowl will never be quite the same again…


Reader's Thoughts...
meemsnyc says
This is a great roundup of yummy treats! Especially the wings, yum!!
pamela dayton time says
oh yes. you should all try the cuban pork.
should we come early on sunday to help prep?
Lisa@ The Cutting Edge of Ordinary says
Bravo! What a post. I fee like a shelp now for just posting one thing! Everything looks wonderful, but I still want to try the Falafel!
Melissa says
Yes, but Krysta and I said center. HA. HA. *Points and laughs*
I cannot wait for you to try the Cuban pork, EVERYONE TRY THE CUBAN PORK, but really, there is just so much here to love.
bellini says
Now there’s a selection for the Siper Bowl that beats all. Of course we could also indulge for Hockey Night in Canada.
Amy says
The Savoury Team, The Sweet Team, and our Halftime Show – I love it. I see you went center…nobody ever listens to me.
Why does finger food need to be reserved for football? Like Turkey on Thanksgiving? Pfft. Clearly you defy these rules, as do I. So if I don’t get to all of these by this Sunday, I will work my way through them the rest of the year. Or maybe even February. You know I have the Cuban Pork on my to-dos. And now, I’ve got my eye on the Pretzel Wrapped Sausages and Bacon/Swiss Muffins. Come to Mama!