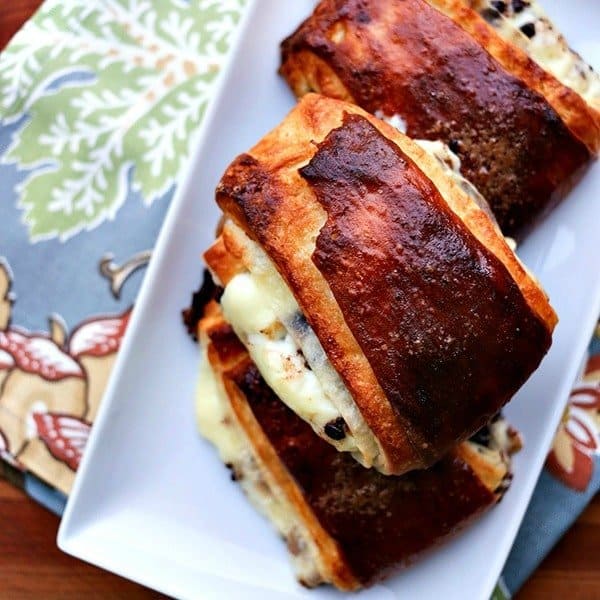
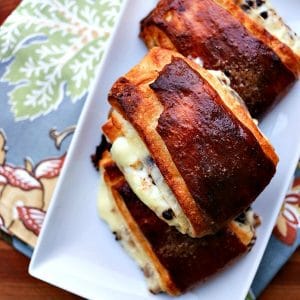
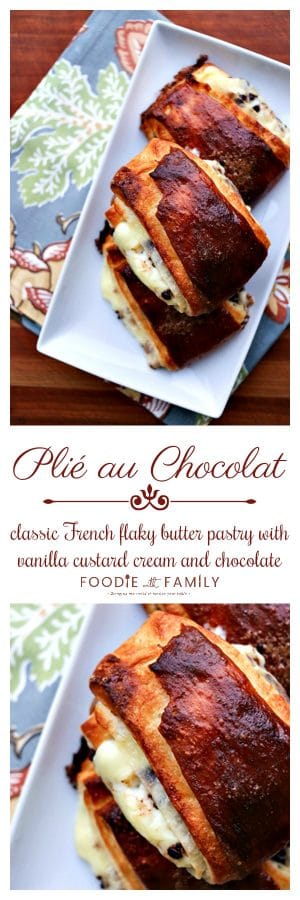
I’m sure you’re familiar with the concept of playing “Last Supper”; name the foods you would choose to eat for your last meal, if you knew it was going to be the last one you ever ate. Plié au Chocolat (literally Chocolate Folds) is one of my “last meal” foods. It is one of the most unassuming, humble looking pastries in the illustrious world of French pastry, but its appearance belies its perfection. The construction is simple: buttery puff pastry spread on one side with pastry cream (vanilla custard), miniature semi-sweet or bittersweet chocolate chips sprinkled over the top, folded, and baked. That something so simple can be so transcendent is one of those miracles of food.
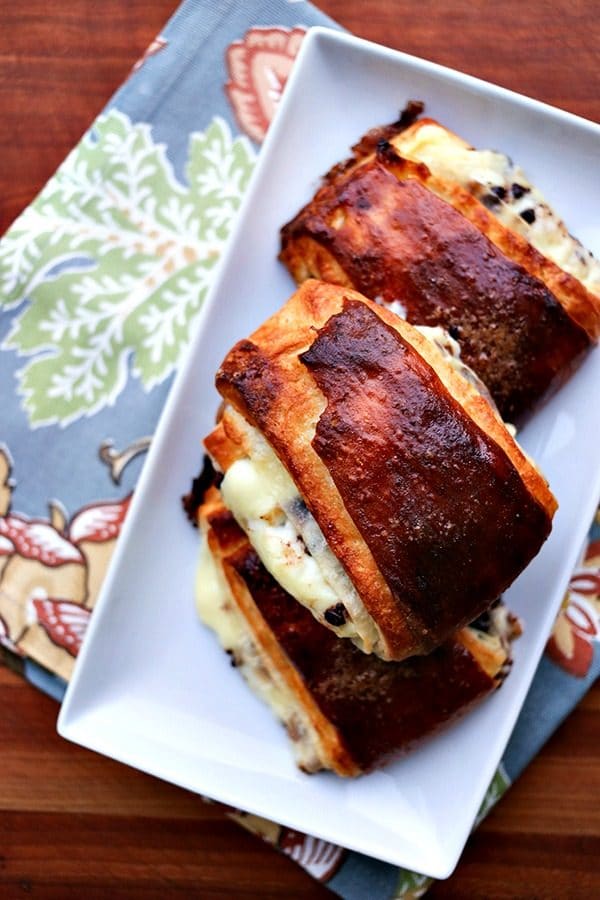
This is pretty much my husband’s favourite pastry ever, too. It’s everything he loves in one beautiful pastry package; custard, chocolate, and flaky butter pastry. I don’t think it can get better than this. Sadly, I have only seen this pastry for sale in France itself or at Maison Kayser in New York City, so if you want to experience the otherworldly perfection that is Plié au Chocolat, you’ll need to make them yourself.
Mercifully, it’s pretty easy once you have your pastry cream and homemade pastry dough on hand, and thankfully, it’s the same pastry dough that we use in our Homemade Croissants, Ham and Cheese Croissants, and Pain au Chocolat. So if you’ve been industrious and made the dough for one of those other delights, this one is basically in your back pocket already. Can you think of anything better on Christmas morning than these?
Cook’s Notes:
- Pastry cream is purchasable, but I prefer to make it from scratch. You can use this excellent recipe to make it.
- Be sure your pastry cream is well and thoroughly chilled before attempting to make your plié au chocolat.
- It is significantly easier to control where your pastry cream goes if you put it into a piping bag or gallon sized zipper top bag with the corner cut off. This will allow you to precisely pipe the pastry cream over half of each rectangle. If you don’t have either of those at your disposal, you can absolutely spoon it over half, I just find that to be a little fussier.
- I’m a fiend for miniature chocolate chips on my plié au chocolat; bittersweet is my choice when I can find it. If you can’t find it, you can substitute mini semi-sweet chips or chop a bittersweet chocolate bar finely and use that in place of the chips. Any of those options will be delicious.
- Be sure to use a rimmed half sheet pan for baking because these will leak a bit as they bake. Don’t worry, they’re meant to do so. It’s only a problem if you have an unrimmed pan and it leaks onto your oven floor.
- I absolutely prefer to line my half sheet pans with silpats to keep my pastry from sticking, but parchment will also do.
Prep Tips {use these to make Plié au chocolat more easily}
- silicone baking mats
- half sheet pan
- french rolling pin (my all time favourite is this one)
- pastry bag
- bench knife or pizza cutter
Look how easy Plié au chocolat are to make!
Plié au Chocolat – French Chocolate and Custard Pastries
Rate RecipeIngredients
- 1 batch homemade puff pastry
- 3 cups chilled vanilla pastry cream in a piping bag or gallon sized ziploc bag
- 2 cups miniature chocolate chips
- 1 egg beaten with a pinch of salt
Optional:
- powdered sugar for dusting the finished pastries
Instructions
- Remove the dough from the refrigerator, unwrap, cut in half, re-wrap half and return it to the refrigerator. Roll out the remaining half of the dough into a rectangle that is roughly 9-inches by 25-inches. Use a pizza cutter, bench knife, or sharp paring knife to trim the sides neatly to an 8-inch by 24-inch rectangle. Cut the dough in quarters lengthwise, then once crosswise, yielding 8 long rectangles.
- Pipe about 3 tablespoons of pastry cream onto half of each rectangle, leaving an empty 1/2-inch of border pastry. Sprinkle a well-rounded tablespoon of the miniature chocolate chips over the pastry cream. Fold the empty half of pastry up over the filled half. Gently press the pastry together at the end. Transfer to a parchment or silpat lined, rimmed baking sheet.
- A half sheet pan should comfortably fit 8 unbaked plie au chocolat. Lay a clean tea towel over the pan and let rest at room temperature for 30 minutes, or until slightly puffy.
- Preheat the oven to 425F. Whisk together a large egg with a pinch of salt until even in colour. Brush the tops of the plie au chocolat with the egg wash. Bake for 23 to 30 minutes, or until the pastry is puffed, set, flaky, and caramelized to a deep rosewood brown. Let the pastries rest on the pan for 5 minutes before transferring to a cooling rack. These are always best when eaten slightly warm on the day they were made, but if there is some weird circumstance in which they’re not all eaten immediately, I have loved them the day after they were made, too.
Video
Nutritional information is an estimate and provided to you as a courtesy. You should calculate the nutritional information with the actual ingredients used in your recipe using your preferred nutrition calculator.
did you make this recipe?
Make sure to tag @foodiewithfam on Instagram and #hashtag it #foodiewithfamily so I can check it out!
Do you LOVE these Plié au chocolat? Try these baked goods!
- Homemade Croissants
- Pain au Chocolat {French Chocolatines}
- Ham and Cheese Croissants
- Hot Ham and Cheese Rolls
- Cinnamon English Muffin Bread
- One Hour Swedish Limpa
- Cheddar Jalapeno Bread
- Peanut Butter Banana Bread
- White Bread
- Death by Chocolate Pumpkin Bread
- Pumpkin Cinnamon Swirl Bread


Reader's Thoughts...
Archie says
Bread story on 1st Av in Manhattan has an incredible + giant plie au chocolat!! Thanks for the recipe.
Rebecca says
Thanks for the heads up, Archie!!!
Tresia says
Hello Rebecca, I dont see a link to the puff pastry recipe anywhere on this page. I was wondering if you could post a link. Also if Im in a pinch for time, can I use store bought raw puff pastry dough. Pepperidge farm puff pastry sheets are available near me. For your recipe do I still cut one of those sheets in half to make the recipe, or do I use a full sheet of theirs. Many thanks for you help!!
Tresia
Rebecca says
Hi Tresia! I’ve fixed the broken link in the recipe card, but for the sake of ease, here’s the link again. https://www.foodiewithfamily.com/how-to-make-croissants/ It is the same dough I use for homemade croissants.
I would not use frozen puff pastry for these, personally, because the homemade stuff is so darned good. If you do opt to do that, I’m afraid I’m not sure how I’d break it down dimension wise. Let me know how it works if you try it out!
Betsy says
Hi.
These are my son’s favorites. We live in NYC and, unfortunately, Maison Kayser fell victim to the pandemic, and we can’t buy their plié’s here any more. So, I’m going to attempt, using your recipe. Quick question: I’m going to make the puff pastry myself and wondering if I can make rough, or does it have to be full puff?
Thanks so much.
Rebecca says
Hi Betsy- I think a rough puff will work just fine for this! Of course, a full puff would get you closer to the Maison Kayser ones (may they rest in peace. Or better yet, make a come back!!), but the rough will yield a delicious plié!
J says
I’m about to start making this for a special occasion—for a family member that *loved* the Kayser pliés (which are no longer available in NYC). I’m a bit freaked out (and excited!) and due to my schedule am planning to make the dough today (thank you for linking to the recipe!), freezing it, and then making the buttercream next weekend (followed by assembly and delivery). Whew! I am very excited and will definitely follow up. But to clarify before I begin—the dough recipe provides makes more than 1 batch (of 8 pliés), correct? (This is why you have us cut it in half at the start?) Thank you in advance!
Rebecca says
Hi J! I’m so sad Kayser doesn’t have pliés available in NYC any more, but so glad we can make our own! Yes, you are correct: you will get 16 total pliés out of the dough. Happy baking!!!
Joanne says
Sorry found it
Joanne says
Pastry cream recipe?
Jill says
These look amazing! Could these be assembled the night before, refrigerated and then baked the next morning? I’m thinking of serving these Christmas morning but don’t have much time that morning.
Rebecca says
Absolutely! You’ll still need to allow for time to proof in the morning, but they can most definitely be assembled the night before and refrigerated!
Cathy says
OMG thes look amazing! I hope to try this recipe soon!